Docker & Jenkins
- Applicable cluster version 1.14 ~ 1.18
I. Overview
When it comes to CI/CD under K8S environment, there are many tools available, such as Jenkins, Gitlab CI, emerging drone, etc. Considering that most companies use Jenkins cluster to build CI/CD processes that meet their needs under VM environment, here we will first introduce the CI/CD scheme of Kubernetes + Jenkins.
1. Jenkins Architecture
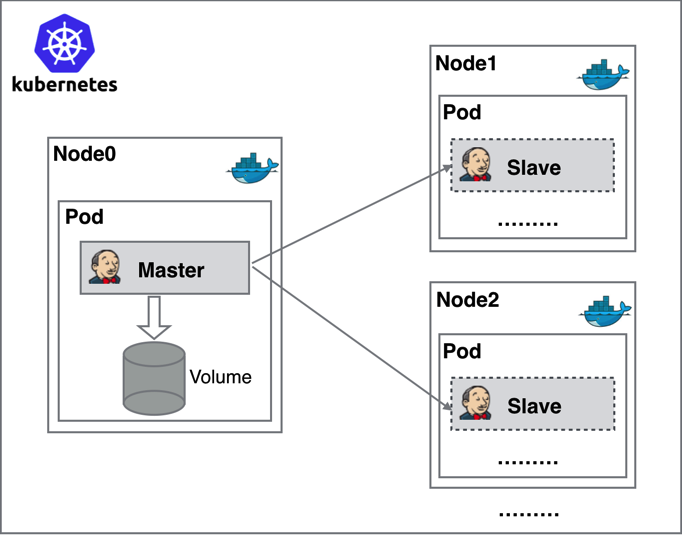
Jenkins Master and Jenkins Slave run on nodes in Kubernetes cluster as Pods. Master is a persistent service, and all configuration data is stored in a Volume. Slave is not always in a running state: it is dynamically created and automatically deleted as needed.
2. Working Principle
When Jenkins Master receives a Build request, it creates a Jenkins Slave that runs in a Pod and dynamically registers it to Master based on the configured Label. When the Job is completed. This Slave is deregistered and the Pod is automatically deleted, returning to its original state.
3. Advantages
Compared to the Jenkins architecture of one master and multiple slaves deployed in a virtual machine environment, deploying Jenkins to K8S brings the following benefits:
-
High Service Availability: When Jenkins Master fails, Kubernetes will automatically create a new Jenkins Master container and assign the Volume to the newly created container, ensuring data is not lost, thus achieving high availability of cluster services.
-
Dynamic Scaling: With reasonable resource usage, each time a Job is run, a Jenkins Slave will be automatically created. After the Job is completed, the Slave is automatically deregistered and the container is deleted, and the resources are automatically released. Moreover, Kubernetes will allocate Slave to create on idle nodes based on the usage of each resource, reducing the appearance of queueing on a node with high resource utilization.
-
Good Scalability: When the resources of the Kubernetes cluster are severely insufficient and the Job is queued, a Kubernetes Node can be easily added to the cluster for expansion.
II. Jenkins Deployment
- For easy management, we deploy all resources to be created in a namespace named jenkins, so we need to add and create a namespace:
kubectl create namespace jenkins- Declare a PVC object, later we will mount the /var/jenkins_home directory of Jenkins container onto this PVC object.
- If your k8s version is greater than or equal to 1.14, and you are not using a Kuaijie cloud host, please deploy.
kubectl apply -f https://docs.ucloud-global.com/uk8s/yaml/cicd/yaml_jenkins_jenkins-pvc.yaml- If your k8s version is less than 1.14, please deploy.
kubectl apply -f https://docs.ucloud-global.com/uk8s/yaml/cicd/yaml_jenkins_jenkins-pvc-1.13.yaml- Deploy Jenkins master in Deployment mode. For easy demonstration, we also expose it to the Internet using a LoadBalancer type of service.
kubectl apply -f https://docs.ucloud-global.com/uk8s/yaml/cicd/yaml_jenkins_jenkins.yaml- After the service starts successfully, we can access the jenkins service based on the IP of LoadBalancer (i.e., EXTERNAL-IP), and install the configuration based on the prompt information.
bash-4.4# kubectl get svc -n jenkins
NAME      TYPE           CLUSTER-IP       EXTERNAL-IP    PORT                        AGE
jenkins LoadBalancer 172.17.201.210 106.75.98.80 8080:33651/TCP,50000:43748/TCP 4d21h- Create a ServiceAccount named jenkins2 and assign it specific permissions. We will use this when configuring Jenkins-Slave.
kubectl apply -f https://docs.ucloud-global.com/uk8s/yaml/cicd/yaml_jenkins_jenkins-rbac.yamlIII. Install Kubernetes Plugin
- We have obtained the external IP address of Jenkins, we can directly enter EXTERNAL-IP:8080 in the browser to open the Jenkins page, prompting to enter the initialization password:
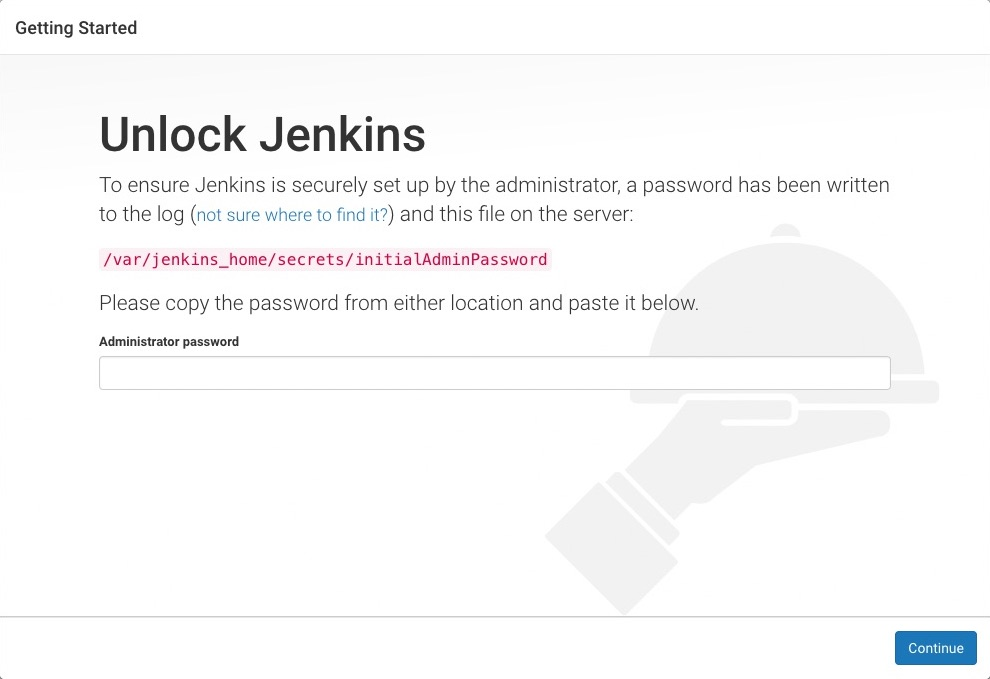
- We get the initialization password by getting jenkins container logs through kubectl logs
kubectl logs jenkins-deployment-66b865dbd-xvmdz -n jenkins
3. Choose Recommended Installation, add administrator account admin, and enter jenkins main interface.
- Install jenkins dependency plugin list - kubernets plugin, so that it can dynamically generate Slave Pod. Click Manage Jenkins -> Manage Plugins -> Available -> Kubernetes plugin to check and install.

The plugin installation is relatively slow, please be patient, and because it is an online installation, the cluster needs to have an internet connection. Please open natgw to make the node node external network.
IV. Configure Jenkins
The most important step is coming. After installing the Kubernetes plugin, we need to configure Jenkins and Kubernetes parameters to connect Jenkins to the UK8S cluster and call the Kubernetes API to dynamically create Jenkins Slave to execute build tasks.
First click Manage Jenkins —> Configure System to enter the system settings page. Scroll to the bottom of the page, then click Add a new cloud —> Choose Kubernetes to start filling in Kubernetes and Jenkins configuration information.
- Enter the UK8S Apiserver address and service certificate key.
You can obtain the above two parameter information from the internal network or external network cluster credentials on the UK8S cluster details page. “Service Certificate Key” is the content of the certificate-authority-data field in the cluster certificate, base64 decode and copy the decoded content into the input box.
- Fill in Cluster Namespace, Upload Credentials, Jenkins Address
For Namespace, fill in the previous namespace name here, which is jenkins. For the credential, click “Add”, select the “Secret file” credential type, copy the entire content of the UK8S cluster details page, save it as kubeconfig and upload it.
-
Click “Test Connection”, and if a “Connection test successful” prompt appears, it means that Jenkins can communicate normally with the Kubernetes system now
-
Next, click “Add Pod Template”. This Pod template is the template for Jenkins-slave pod.
- namespace, fill in “jenkins” here
- label list, fill in “jnlp-slave” here, we will use this label when creating Jobs later, very important.
- usage, choose “use this node as much as possible”
- Docker image, fill in “uhub.ucloud-global.com/library/jenkins:jnlp”, this container image is our CI/CD running environment.
- working directory, fill in “/home/jenkins”
select add volume, fill in “/var/run/docker.sock” for both host path and mount path to allow jenkins-slave to use Docker on the host so we can do image Build operations in the container.
Click the Advanced at the bottom, Service Account enter jenkins2, this is the SA we created earlier.
other parameters just for demonstration, we all use default values, in actual use, please select reasonable parameters. Here our Kubernetes Plugin plug-in is considered configured.
V. Run a simple task
The configuration work of Kubernetes plugin is done. Now let’s add a Job task and see if it can be executed in Slave Pod. See if Pod can be destroyed after task execution is completed.
-
Click create new jobs on the Jenkins home page, create a test task, enter the task name. Then we select the Freestyle project type of task, and click OK.
-
In the job configuration page, the Label Expression at the bottom should be filled in jnlp-slave, which is the Label we configured in the Slave Pod earlier. These two places must be consistent
-
In the Build area of the task configuration page, choose Execute shell, enter a simple test command, and click save.
-
Click View Console output, and view task execution status.
Here we have completed the method of dynamically generating Jenkins Slave using Kubernetes.
VI. Run a pipeline task
1. Pipeline Introduction
Pipeline, simply put, is a workflow (pipeline) framework running on Jenkins that connects tasks that were originally operated independently on one or more nodes, implementing complex process orchestration and visualization tasks that a single task cannot complete. Jenkins Pipeline has several core concepts:
-
Node: A Node is a Jenkins node, which is the specific operating environment for executing Step. For example, the Jenkins Slave we dynamically ran earlier is a Node.
-
Stage: A Pipeline can be divided into several Stages, and each Stage represents a group of operations. Build, Test, Deploy, Stage are logical grouping concepts, which can span multiple Nodes.
-
Step: Step is the most basic unit of operation, which can be a phrase or a Docker image, provided by various Jenkins plugins. The command: sh ‘make’ is equivalent to executing the make command in our usual shell terminal.
2. Create a pipeline task
Pipeline can be created in two ways: one is to directly enter the script in the Web UI of Jenkins, and the other is to create a Jenkinsfile script file and put it in the project source code repository. Here, for the convenience of demonstration, we use the method of entering scripts in the Web UI to run Pipeline.
-
Click “new item”, enter Job name, select Pipeline, click “OK”.
-
In the lower part of the pipeline script, enter the following script content and click save
node('jnlp-slave') {
    stage('Clone') {
      echo "1.Clone Stage"
    }
    stage('Test') {
      echo "2.Test Stage"
    }
    stage('Build') {
      echo "3.Build Stage"
    }
    stage('Deploy') {
      echo "4. Deploy Stage"
    }
}
In the script content above, we added a jnlp-slave tag to the node, specifying that all four stages of this pipeline run on the jenkins slave nodes.
- After the task is created, click “Build Now”, we can find that a new pod is starting in the UK8S cluster for build task through kubectl command.
bash-4.4# kubectl get po -n jenkins
NAME                                  READY   STATUS              RESTARTS   AGE
jenkins-deployment-6f9d84f745-lcs67   1/1     Running             0          5d2h
jnlp-0qn7x 0/1 ContainerCreating 0 1s- Go back to the Web UI of Jenkins to view the Console Output of this building history. You can also get similar information, indicating that the building was successful
Console Output
Started by user kukkazhang
Running in Durability level: MAX_SURVIVABILITY
[Pipeline] Start of Pipeline
[Pipeline] node
Still waiting to schedule task
‘jnlp-7m9dl’ is offline
Agent jnlp-7m9dl is provisioned from template Kubernetes Pod Template
Agent specification [Kubernetes Pod Template] (jnlp-slave):
* [jnlp] uhub.ucloud-global.com/library/jenkins:jnlp

Running on jnlp-7m9dl in /home/jenkins/workspace/testhelloworld
[Pipeline] {
[Pipeline] stage
[Pipeline] { (Clone)
[Pipeline] echo
1.Clone Stage
[Pipeline] }
[Pipeline] // stage
[Pipeline] stage
[Pipeline] { (Test)
[Pipeline] echo
....
....
6. Deploy Stage
[Pipeline] }
[Pipeline] // stage
[Pipeline] }
[Pipeline] // node
[Pipeline] End of Pipeline
Finished: SUCCESS
VII. Deploy Apps in UK8S
Above, we have learned how to build a Pipeline task in Jenkins Slave. So how do we deploy a native Kubernetes app through Jenkins?
Generally speaking, deploying a service in Kubernetes goes through the following process:
-
- Code writing
-
- Testing
-
- Writing Dockerfile
-
- Building Docker image
-
- Pushing Docker image to repository
-
- Writing Kubernetes YAML file
-
- Changing the Docker image TAG in YAML file
-
- Using kubectl tool to deploy application
This is the process for us to deploy applications manually. What we need to do now is to integrate these processes into Jenkins to automate them. The steps from testing to updating the YAML file belong to the CI process, and the subsequent deployment falls into the CD category. Next, we will write a Pipeline script to help us automatically complete the above work.
Preparation Before Start
For easier demonstration, we have prepared a simple helloworld program and placed the business code, dockerfile and yaml in the github code repository , branch: jenkins-cicd. Now let’s start writing Pipeline scripts step by step.
- Clone code. We use the record of git commit as the tag of the image to be built later, so that the image tag and git commit record correspond, which is convenient for subsequent troubleshooting.
 stage('Clone') {
        echo "1.Clone Stage"
        git branch: 'jenkins-cicd', url: "https://github.com/ucloud/uk8s-demo.git"
        script {
            build_tag = sh(returnStdout: true, script: 'git rev-parse --short HEAD').trim()
        }
}- Write test cases. This involves business logic. Let’s skip.
stage('Test') {
    echo "2.Test Stage"
}- Build image. The image tag is just the build_tag defined in the stage of cloning the code. Note to replace “jenkins_k8s_cicd” with your own uhub repository.
stage('Build') {
        echo "3.Build Docker Image Stage"
        sh "docker build -t uhub.ucloud-global.com/jenkins_k8s_cicd/jenkins_k8s_cicd:${build_tag} ."
}- Push the image to the image repository. We choose to push the image to the private repository of Uhub, so we also need to log in to uhub. Note to replace “jenkins_k8s_cicd” with your own uhub repository.
  stage('Push') {
        echo "4.Push Docker Image Stage"
        withCredentials([usernamePassword(credentialsId: 'uhub', passwordVariable: 'uhubPassword', usernameVariable: 'uhubUser')]) {
            echo "${uhubPassword}"
            echo "${uhubUser}"
            sh "docker login -u ${uhubUser} -p ${uhubPassword} uhub.ucloud-global.com"
            sh "docker push uhub.ucloud-global.com/jenkins_k8s_cicd/jenkins_k8s_cicd:${build_tag}"
        }
}
For account security, we used a “credential” feature of Jenkins in the above script. Click Credentials ->Stores scoped to Jenkins below Jenkins ->Global credentials (unrestricted) -> Add Credentials on the left: add a Username with password type of authentication information.
Enter the username and password of uhub, and enter uhub in the ID section. Please note that this value is very important, which needs to be consistent with the script in Pipeline.
- Update yaml file. Here we just replace the image tag in yaml with the latest built image tag.
stage('YAML') {
    echo "5. Change YAML File Stage"
    sh "sed -i 's/<BUILD_TAG>/${build_tag}/' k8s.yml"
}- Application release. We use kubectl apply command directly to update the application. Do you remember the ServiceAccount named jenkins2 we created earlier? The successful deployment of the application also depends on the permissions we configured for jenkins2.
stage('Deploy') {
    echo "6. Deploy Stage"
    sh "kubectl apply -f k8s.yml"
}- We’ve talked about each Stage in the pipeline one by one. Now let’s combine the scripts of the 6 stages together, create a new pipeline task, and experience the complete application release process.
node('jnlp-slave') {
    stage('Clone') {
      echo "1.Clone Stage"
      git branch: 'jenkins-cicd', url: 'https://github.com/ucloud/uk8s-demo.git'
      script {
          build_tag = sh(returnStdout: true, script: 'git rev-parse --short HEAD').trim()
      }

    }
    stage('Test') {
      echo "2.Test Stage"
    }
    stage('Build') {
      echo "3.Build Docker Image Stage"
      sh "docker build -t uhub.ucloud-global.com/jenkins_k8s_cicd/jenkins_k8s_cicd:${build_tag} ."

    }
    stage('Push') {
      echo "4.Push Docker Image Stage"
      withCredentials([usernamePassword(credentialsId: 'uhub', passwordVariable: 'uhubPassword', usernameVariable: 'uhubUser')]) {
            echo "${uhubPassword}"
            echo "${uhubUser}"
            sh "docker login -u ${uhubUser} -p ${uhubPassword} uhub.ucloud-global.com"
            sh "docker push uhub.ucloud-global.com/jenkins_k8s_cicd/jenkins_k8s_cicd:${build_tag}"
        }

    }
    stage('YAML') {
      echo "5. Change YAML File Stage"
      sh "sed -i 's/<BUILD_TAG>/${build_tag}/' k8s.yml"
    }
    stage('Deploy') {
      echo "6. Deploy Stage"
      sh "kubectl apply -f k8s.yml"
    }
}